
Let's take the example of a CI/CD pipeline that generates a development VM template. In the long term, this pipeline not only saves time when onboarding new arrivals by providing them with a template to automatically deploy a Dev VM with all the essential technical elements already configured (networks, certificates, internal repositories, etc.), but also ensures consistency and a sound development strategy. This strategy standardizes the developers' development environment, which is a fundamental practice for technical projects. To illustrate this point, let's take the following example: one developer uses a Rocky Linux 8.7 VM while another uses a Rocky Linux 9.2 VM. Since their development environments are significantly different, there is a very high chance that the code will work for the first developer but not for the second, and vice versa. For example, to install the go package, the first developer will have to download the binary for this package and then install it manually, while the second developer will be able to use the repositories on their VM directly. Obviously, this example is crude given the notable differences between a Rocky Linux 8.7 and 9.2 VM, but this problem remains the same for much finer differences in environment (for example, even the same operating system version but different versions of a package or systemd service installed between the developers' VMs). Standardizing the development environment within a Dev team is therefore very important, and for this reason, generating CI/CD pipelines for infrastructure as code is a considerable asset.
Finally, the last advantage that a CI/CD pipeline brings to the world of development is test automation. This consolidates consistency and long-term development strategy, drastically reducing errors when integrating new features. Let's take the following example: a developer implements a new feature in a relatively complex application. Once they have completed their task, they verify that it has the desired effect by testing the different parts of the application that they believe will be impacted by their changes. But without a CI/CD pipeline, given the relative complexity of the application, unless this developer has 100% mastery of the application (which is very rare), they cannot be sure that their changes will not impact parts of the application that they had not anticipated. With the CI/CD pipeline, this scenario will not occur, or at least much less frequently, regardless of the developer's profile, because if their changes impact a part of the application that they did not anticipate, then if the pipeline tests are well written, the pipeline will crash and directly inform the developer of the job(s) impacted by their changes.
Another major factor explaining the increase in demand for these skills is the exponential rise in cyber risk in recent years. Companies are now keen to use automation to protect themselves from cyber attacks (static code analysis, dynamic code analysis, vulnerability detection, hardening and securing operating systems, etc.). Together, we will look at creating a CI/CD pipeline to improve the development performance of a project that hardens and secures an ISO of a Linux distribution (Rocky Linux 9.4).
For this type of project, we will look at the advantages of a CI/CD pipeline. To do this, we will first create a stable and inexpensive development environment (by creating a private cloud using OVH bare metal servers and our own Gitlab runners). Then, we will automatically build our ISO, focusing on the build and deployment automation tasks specific to CI/CD pipelines. Next, we will look at how to automatically deploy a VM from the secure ISO generated, and finally how to automatically test this deployed VM and the security of our code.
Summary:
- Configuring your private cloud
- Creating your own GitLab runners
- Quick tutorial on creating pipelines via Gitlab CI
- Automatic ISO build
- Automated detection of code and container vulnerabilities
- Automatic deployment of a VM with secure ISO
- Application of automated tests via Ansible on three VMs, including the one deployed from the secure ISO
- Conclusion
Configuring your private cloud
Choosing a server at OVH and installing the Proxmox V8 hypervisor
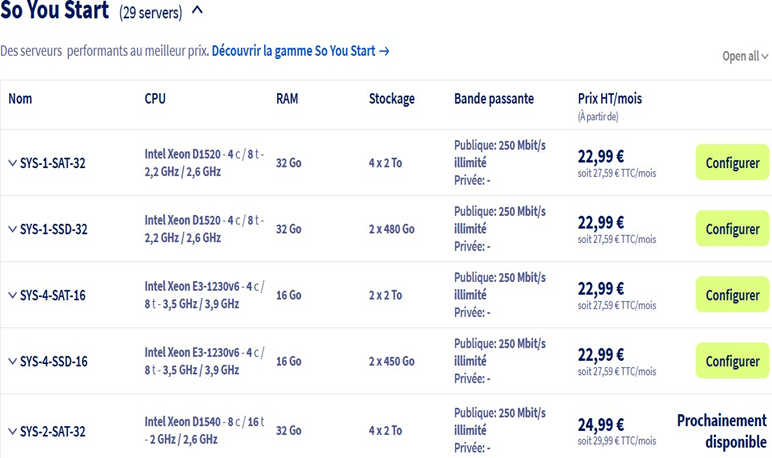
To have our own private cloud, we will use a bare metal server from OVH and install the Proxmox hypervisor on it. Why? Simply because it will be the cheapest solution. AWS and Azure offer many more services, but are much more expensive. For this, I recommend choosing a "So you start" bare metal server from OVH. There are 29 in total with roughly similar resources and costing €27.50 per month with no commitment. This may seem expensive at first glance, but it isn't, because you will be free to use your server as you see fit and you won't be charged per use, which is much more expensive. I chose the SYS-1-SSD-32 server, which offers 32 GB of RAM, 8 CPUs, and two 480 GB SSD drives for €27.50 per month with no commitment. To do this, create an account on OVHcloud, then go to Bare Metal Cloud --> Order --> Dedicated server, then select the "Eco" servers at the bottom of the page (see screenshot 1) and the "So you start" server of your choice (see screenshot 2).

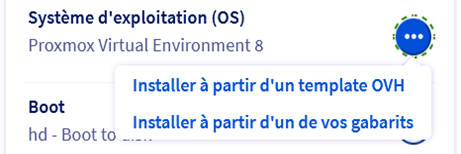
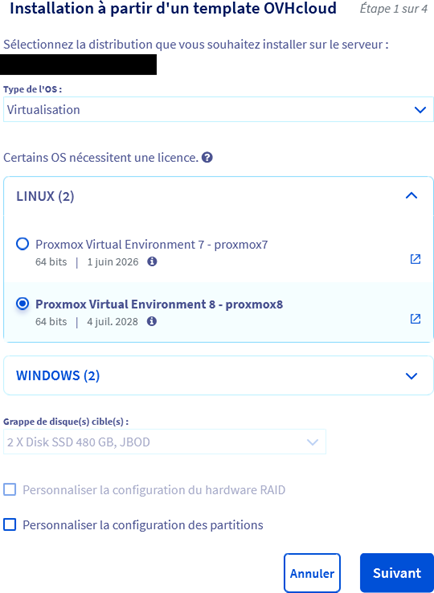
After ordering it, OVH provides installation templates for many distributions (Alma Linux, Ubuntu, Windows, Rocky Linux, Proxmox, etc.). We will use the Proxmox 8 template to install the Proxmox 8 hypervisor on our server.
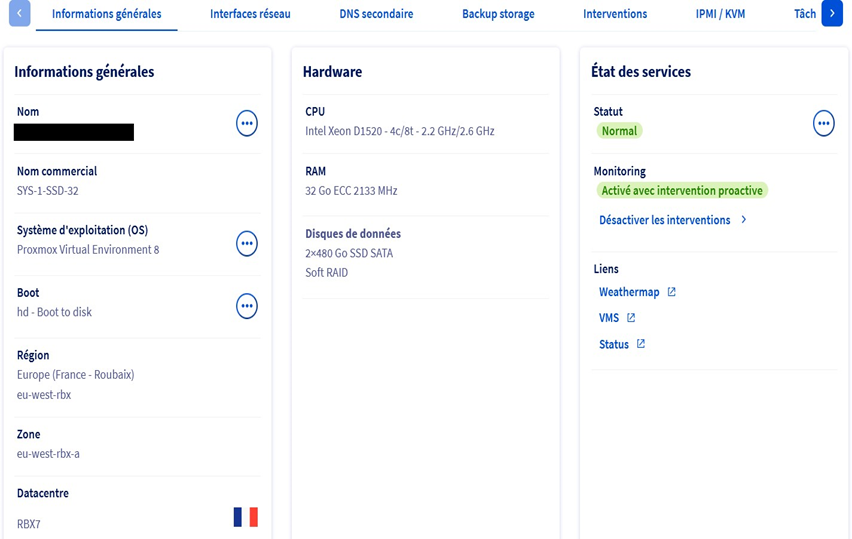
We can see that my OVH server has Proxmox V8 as its operating system, that it has 32 GB of RAM, 8 CPUs, and two 480 GB SSD drives, and that it is hosted in the OVH data center in Roubaix.
Security configuration:
We now have our Proxmox hypervisor hosted on our server, so we can begin configuring it. Let's start with some security settings:
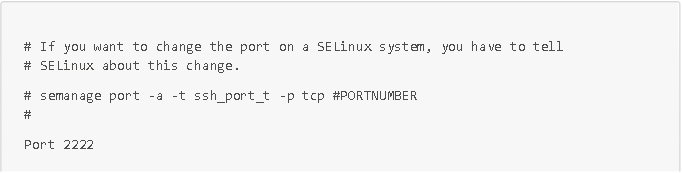
- Change the default ports for standard services (for example, for http, https, and ssh services: replace port 80 with 8080, 443 with 4433, and 22 with 2222). IMPORTANT: be sure to inform SElinux of the port changes, otherwise Selinux will block you. To do this, as administrator, apply the command semanage port -a -t service_port_t -p tcp.
- new_port_number (for example, semanage port -a -t ssh_port_t -p tcp 2222 to inform SElinux of the port change for the SSH service)
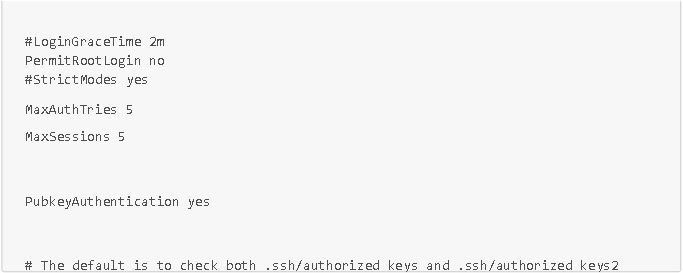
- Creating an admin user to avoid using the root account Securing SSH connections:
- Disable login via the root account
- Disable password login (logins only possible via SSH key)
- Set a maximum number of attempts to authenticate (5)
To perform these actions, connect via SSH using the admin user you created, then edit the configuration file /etc/ssh/sshd_config with the elements shown in the screenshot below:
These small, quick security configurations are very effective in countering bot attacks.
Network configuration
Now that we have secured our server against bot attacks, we can configure the network. Although our server's network has already been configured by the OVH teams, this will unfortunately not be the case for the VMs that we are going to create on our Proxmox hypervisor (hosted on our server). To do this, we will purchase an additional IP (again from OVH), then create a routing VM that will route the subnet mask network of this additional IP address to all the VMs we are going to create on our Proxmox hypervisor. We will use an Opnsense VM as the routing VM, but you can also use a PfSense VM if you prefer.
To order an additional IP from OVH: go to Bare Metal Cloud --> Order --> Additional IP
--> IPv4 --> Additional IP. You can then download the ISO image of an Opnsense VM at the following address: https://opnsense.org/download/.
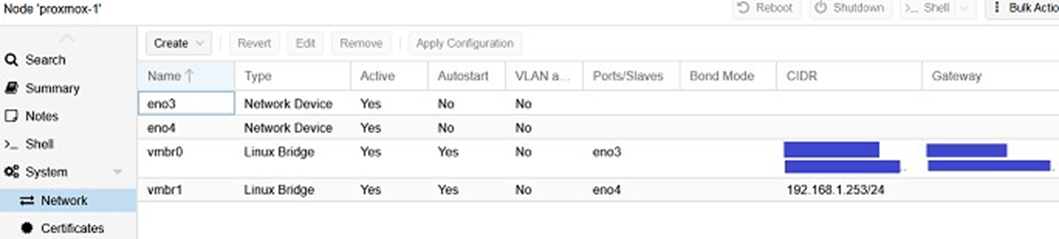
Before creating our routing VM, we need to create a new network bridge on our Proxmox hypervisor, so that we have a LAN and WAN interface for our routing VM. To do this, go to proxmox-1 --> network and add the vmbr1 bridge, assigning it the available Ethernet network eno4 (see screenshot below).
Once this network bridge has been created, we can create our Opnsense VM. To do this, create a VM in Proxmox using the Opnsense VM ISO downloaded earlier and the following configurations:
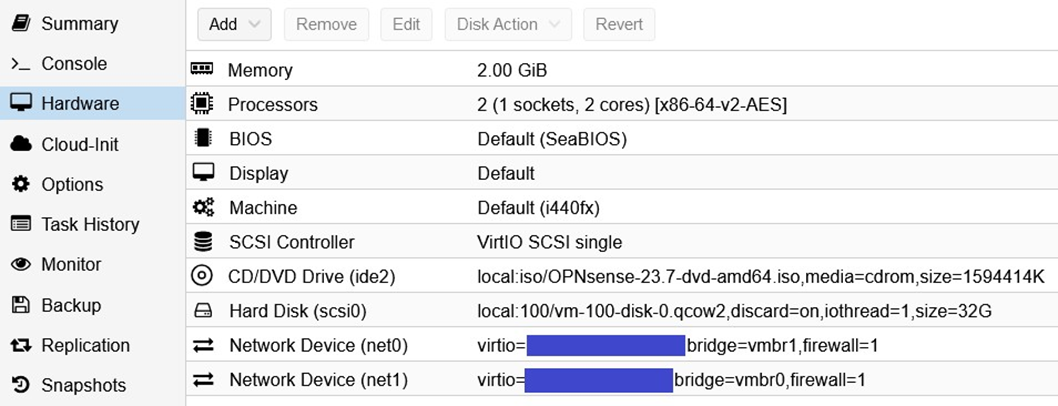
IMPORTANT: For network configurations, please note that I have hidden the MAC addresses. The MAC address for the vmbr1 bridge is completed automatically and without difficulty (net0), but it is very important for the vmbr0 bridge (net1) to manually enter the MAC address of your additional IP. To do this, simply consult the characteristics of your additional IP address on OVH Cloud.
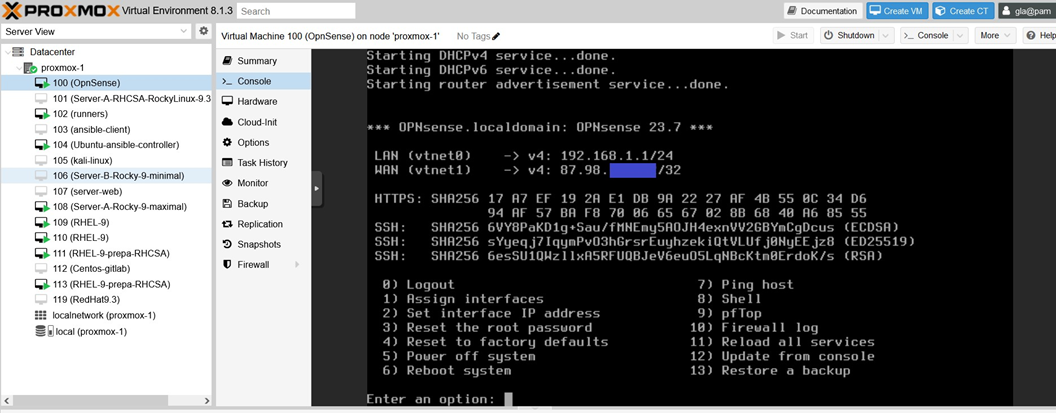
Now that we have our two network devices properly configured using our two bridges (vmbr0 and vmbr1) and our additional IP address, we can start the Opnsense VM. The VM will then begin its installations and configurations to route the network by configuring a LAN (local area network) on the net0 network device using the vmbr1 bridge and a WAN (wide area network) on the net1 network device using the vmbr0 bridge. It will complete the LAN configuration, but not the WAN configuration, as it will need the additional IP address. You must therefore configure the WAN manually. To do this, you need to log in to the VM with the default credentials, which are username: root and password: opnsense, then change the password for security reasons using option 3, and assign your additional IP address to the WAN interface using option 2. If everything goes well, you should see your additional IP address defined on the WAN, and the network should be enabled on all VMs on your Proxmox node with the vmbr1 bridge as their network interface.
Now that our Proxmox hypervisor is ready and properly configured on our bare metal server, we have a stable sandbox environment where we can run any tests we want and start creating CI/CD pipelines. However, before creating these pipelines, we will need to create our own runners.
Creating your own GitLab runners:
To launch CI/CD automation pipelines, Gitlab uses runners that it provides directly, but these runners are limited in terms of usage, which varies depending on the Gitlab version (only 200 minutes of CI/CD and, more importantly, 5 GB of storage for the free version, 10,000 minutes per month for the premium version, but at $29 per month, which for the latter version is more than enough for an individual but is quite expensive, and is often insufficient for large companies). You can find details of the prices for the three Gitlab packages at the following address: https://about.gitlab.com/fr-fr/pricing/. To avoid being limited in our pipeline executions, we will therefore create our own Gitlab runners on our private cloud. There are a large number of Gitlab runners, but we will only create the two most commonly used types, namely shell runners and docker runners. This will be more than enough for our project.
For more details on all the types of runners available, please visit https://docs.gitlab.com/runner/executors/.
To have our own Gitlab runners, we will create them on a Linux VM on our server with high storage capacity (200 GB of storage, VM 102 Runners from my Proxmox hypervisor with Rocky 9.2 distribution on the previous screenshot). Once we have a VM with large storage capacity, we need to create the runner manually on our project in Gitlab. To do this, create a project in Gitlab, then go to Settings --> CI/CD --> Runners --> New Project runner for your project. Then add tags that make sense to you (these tags will be used to call your runners in your pipeline jobs). For example, you can define tags such as: proxmox or my-first-runner. Then click on Create runners and your runner will be created by default for a Linux platform and its authentication token will be displayed (make sure you copy this token carefully).
We now have our runner created, but it is not yet linked to the VM on our server where we want to host it. There are two possible methods for doing this: using the gitlab-runner command in a Linux operating system, or using the gitlab/gitlab-runner docker image (my storage VM is a Rocky 9.2 VM, so both methods are possible for this VM). These two methods are described below:
Via Linux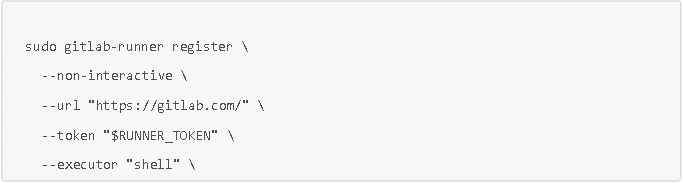
Via Docker (IMPORTANT: be sure to use the Docker service and not Podman)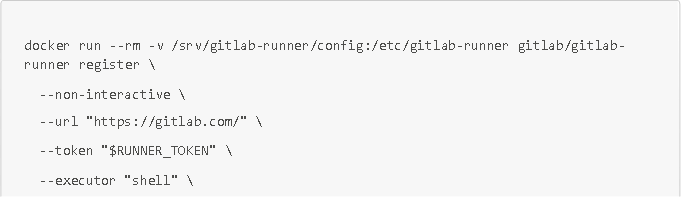
With $RUNNER_TOKEN, the runner's authentication token.
NOTE: To create a Docker runner, simply use the same commands but with the Docker argument for the --executor parameter.
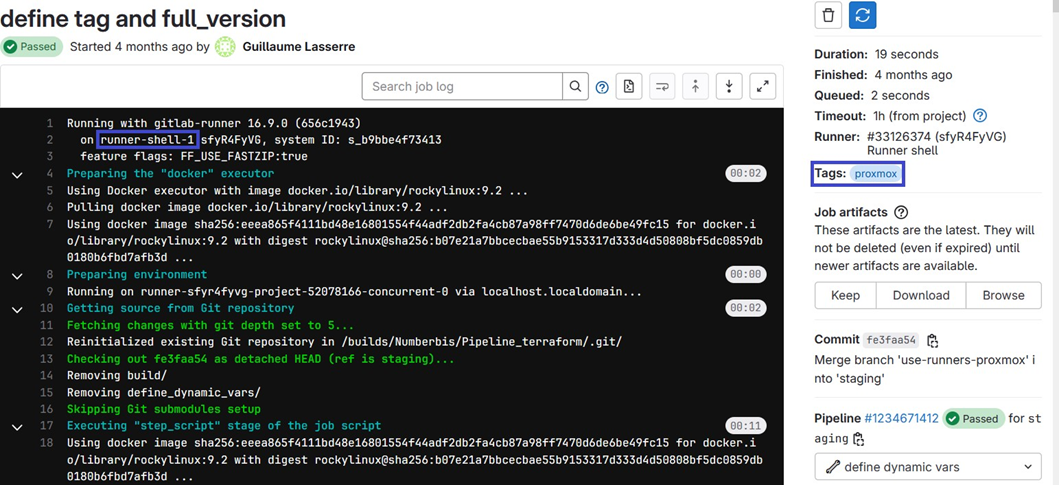
EXAMPLE: Here is an execution of a CI/CD pipeline job performed from our own runner runner-shell-1 and called by the job via the proxmox tag (see blue boxes).
Quick tutorial on creating pipelines via Gitlab CI
To create a pipeline in one of your GitLab projects, you need to create a YAML configuration file named .gitlab-ci.yml at the root of your project. This file will allow you to configure your pipeline. Here are a few tips for configuring it.
Order of stages and job execution
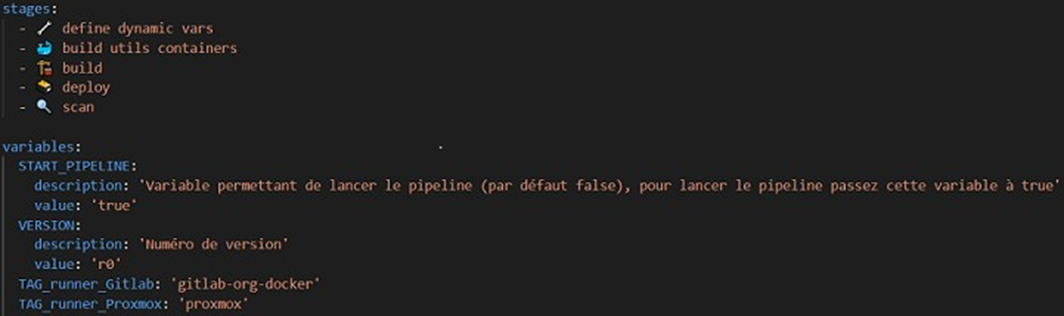
To define stage execution orders, you can set them at the beginning of the pipeline after the stages line: if you put several jobs in the same stage, they will run in parallel (i.e., at the same time) as long as you have enough runners available for all the jobs. For greater clarity and visibility in the execution of parallel jobs (for example, when there are more than a dozen jobs to run in parallel), it is advisable to use a matrix via the matrix command.
Environment variables
To define environment variables, you can use the variables statement: GitLab also provides many useful predefined variables, such as the variable.
CI_COMMIT_BRANCH giving the name of the branch, or the variable CI_COMMIT_SHA giving the commit hash. You can find all these variables at the following address: https://docs.gitlab.com/ee/ci/variables/predefined_variables.html.
Job execution environment and code readability
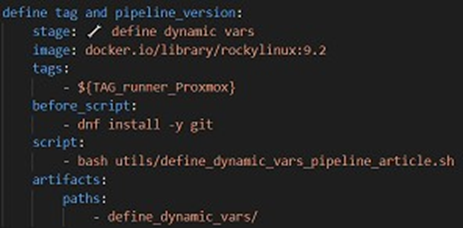
Jobs run in containers whose images must be defined in the job's image parameter. The job execution runners are chosen from the tags variable (see screenshot). Without defining this variable, the pipeline runs by default with shared Gitlab runners. To improve the readability of your code and pipeline, you can use emojis from the Gitmoji project. This is particularly useful for clearly differentiating stages.
Automatic ISO build
Now that our testing infrastructure is set up and configured (private cloud and GitLab runners), we can start automating the build of our secure ISO. To do this, we will follow these three steps:
- Definition of an artifact nomenclature strategy and pipeline launch
- Downloading the Rocky Linux 9.4 ISO and automatically modifying it to make it more secure
- Automatic deployment of the secure ISO in a repository
Definition of an artifact nomenclature strategy and pipeline launch
For any CI/CD pipeline, the first step is to configure a method for efficiently and automatically defining a nomenclature for artifacts, so as to ensure that execution results are not overwritten by the results of another execution. For example, without automatic configuration of the artifact nomenclature, the artifacts from each execution would have the same name, and therefore the results of execution N-1 would be deleted by the results of execution N. Another factor to consider is the frequency of pipeline execution. While it is important to run the pipeline automatically for each commit on the production (main or master) or common development (qa, develop, or staging) branches, this is not the case for developer evolution branches, which only launch the pipeline when they think they have finished their evolutions, and not at each commit. It is therefore important to configure these two elements automatically in our pipeline. To do this, we will use a job that will automatically define environment variables using a bash script according to the pipeline execution branch, then add a rule to our configuration file to define when the pipeline should be launched.
Rule allowing a pipeline to be launched or not

This rule added to the .gitlab-ci.yml file allows the pipeline to be launched if the START_PIPELINE variable available in the Gitlab interface has been set to True by a developer who wants to test their code, or if the branch is a production or common development branch (master, main, or develop).
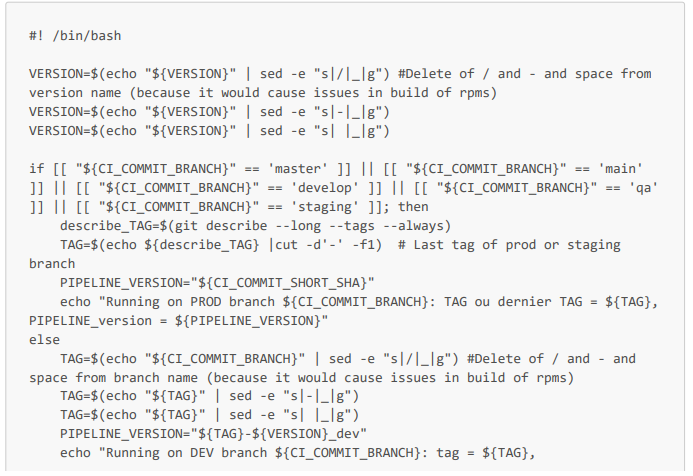
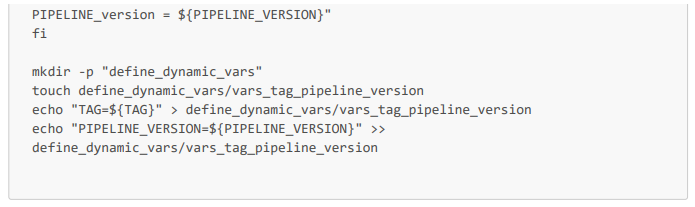
Here is the job in the .gitlab-ci.yml configuration file and the Bash script. Note that this script allows you to define the TAG and PIPELINE_VERSION environment variables. The PIPELINE_VERSION variable will allow you to have a unique artifact name for each pipeline execution, thus avoiding artifact conflicts when deploying them to repositories. Note: the $VERSION variable in the script is a variable with a default value of V1_dev, and is configured so that developers can enter this value directly in the Gitlab interface (if they want to have a more meaningful artifact name than the name of their branch followed by r1_dev, or especially if they want to run the pipeline several times on the same dev branch).
Bash script that automatically defines the nomenclature of artifacts
Pipeline job in the .gitlab-ci.yml configuration file
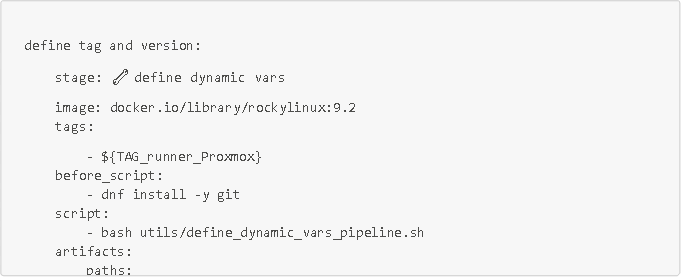
On peut noter que ce job s'applique dans un conteneur rockylinux 9.2 (créé à partir de l'image docker.io/library/rockylinux:9.2), qu'il est exécuté par un de nos runners (de tag ${TAG_runner_Proxmox}), donc directement dans notre serveur, et qu'il enregistre en artifacts le dossier define_dynamic_vars.
Downloading the minimal Rocky Linux 9.4 ISO and modifying it to secure it and add features
To download a Rocky Linux 9.4 ISO and automatically modify it to secure it via a CI/CD pipeline job, we will first go into a Rocky Linux 9.3 container and build a Bash script that will perform all the necessary tasks. Then, once we have tested this script, we will run it directly in a CI/CD pipeline (still via Gitlab-CI and with our runners).
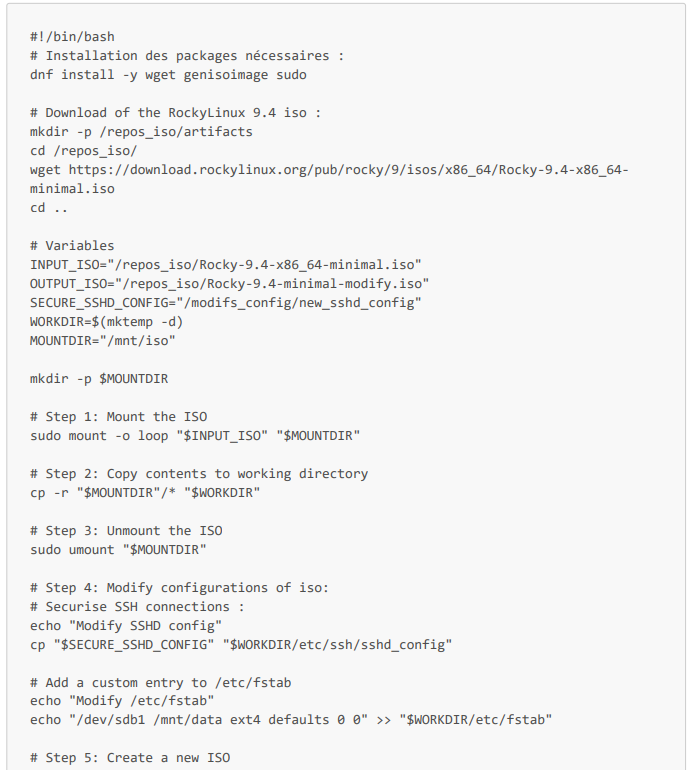
Let's start writing our script. The first step is to install the necessary packages. In our case, we have three packages to install: wget to download the ISO, genisoimage (equivalent to xorrizo) to modify it, and sudo for rights management. After installing the necessary packages, we download the ISO using wget. Then we can start modifying our ISO. To do this, we must first mount the ISO on our system in one of our empty directories (for example, /mnt/iso), then copy all the folders and configuration files from the mounted ISO to our temporary working directory (variable $WORKDIR in the script).
We now have all the configuration files and folders for our ISO saved in our working directory (WORKDIR), and we can apply any changes we want to add features (by adding RPMs, for example), strengthen its configurations, and secure it.
For confidentiality reasons, we will not make any major changes to the security configurations and we will not create secure RPMs, but this will be a first step in understanding the approach to take when modifying and securing an ISO. For example, we can apply the security rules we implemented on our server in Part 1 (changing the default ports for ssh, http, and https services, and securing SSH connections) and add a mount entry. To do this, we just need to assign the new secure configurations to the existing configurations of the ISO and, for our mount, add an entry to the /etc/fstab file.
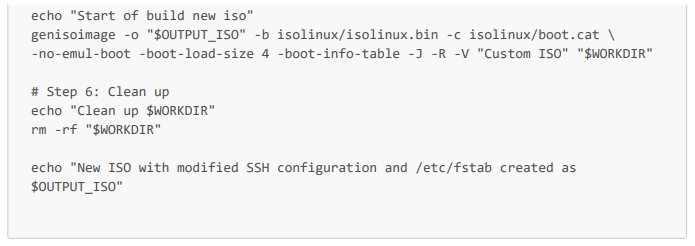
This gives us the following script (which we will call download_and_modify_iso_rocky_9_4.sh in our pipeline job).
Complete Bash script:
To automate this in our CI/CD pipeline, we simply need to run this script (download_and_modify_iso_rocky_9_4.sh) in a Rocky Linux 9.3 container or another compatible container. We could also use a Red Hat container, for example. Here is a job running this script in a Gitlab-CI pipeline:
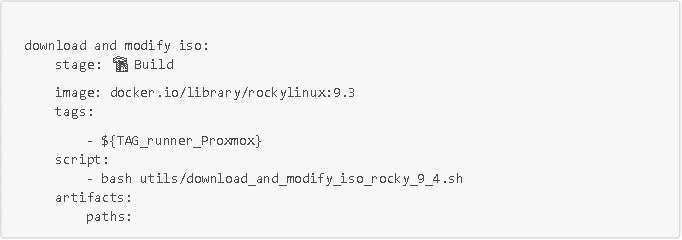
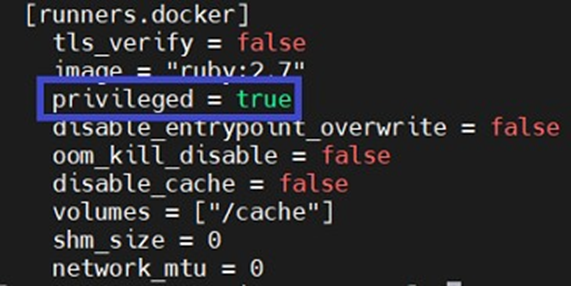
IMPORTANT: Please note that in order to mount ISOs, containers require additional rights (via the --privileged option). You will therefore need to modify your runner configuration (file /etc/gitlab-runner/config.toml) by setting your runner's privileged parameter to true (see screenshot below). Otherwise, when running the pipeline, the script will crash in your Rocky Linux 9.3 container when mounting the ISO.
Secure ISO deployment in a repo
Ideally, storage solutions such as Artifactory, Azure datalake, or Amazon S3 are preferable for large companies. However, since we have insufficient resources (32 GB of RAM and two 480 GB SSD drives) to set up an Artifactory instance, and Azure Data Lake and Amazon S3 are expensive, we will simply store our artifacts in a folder named "repos_artifacts" on a VM created on our Proxmox instance.
NOTE: If your company uses Artifactory, I recommend using Python's requests library to automatically deploy your artifacts.
We then have an automatic build, which not only speeds up the build process for cyber developers, but also, and more importantly, provides them with a perfectly standardized development environment for the project, drastically improving their efficiency on highly technical projects. I emphasize this point because it is very often underestimated by project managers and managers. To better detail and understand this advantage, the automatic build ensures that a developer's developments can be integrated into the application without creating major functional problems, and ensures that each developer tests their developments on exactly the same infrastructure (versions and configurations that are identical in every respect), which makes it possible to identify conflicts between developers' developments more quickly.
With build automation complete and developers able to use it to increase efficiency, the next high-value-added step in the pipeline is now test automation. In today's environment of significant cyber risk, it is important to first automate code and container vulnerability checks.
Automated detection of code and container vulnerabilities
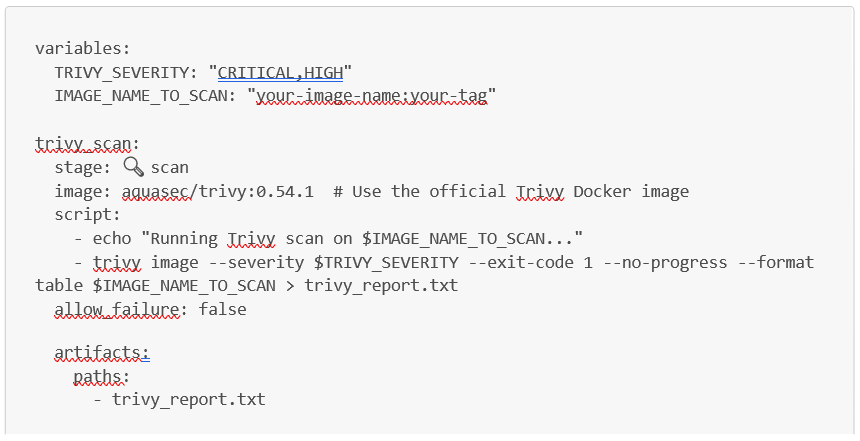
To automate vulnerability checks at the container level, the trivy docker image is very useful.
To use it directly in a Gitlab CI pipeline, you can use the following job, replacing the IMAGE_NAME_TO_SCAN variable with the docker image you want to scan via Trivy. Trivy will then generate a security report as an artifact (named trivy_report.txt for our job).
Then, to automate code vulnerability checks via static and dynamic code analysis, you can use Checkmarx or Sonarqube.
Now that we have tested the security of our Docker images using Trivy, we can begin functional testing. To do this, the first step is to automate the creation and deployment of a VM with the secure ISO in our pipeline. Next, we will automate testing on this VM.
Automatic creation and deployment of a VM with secure ISO
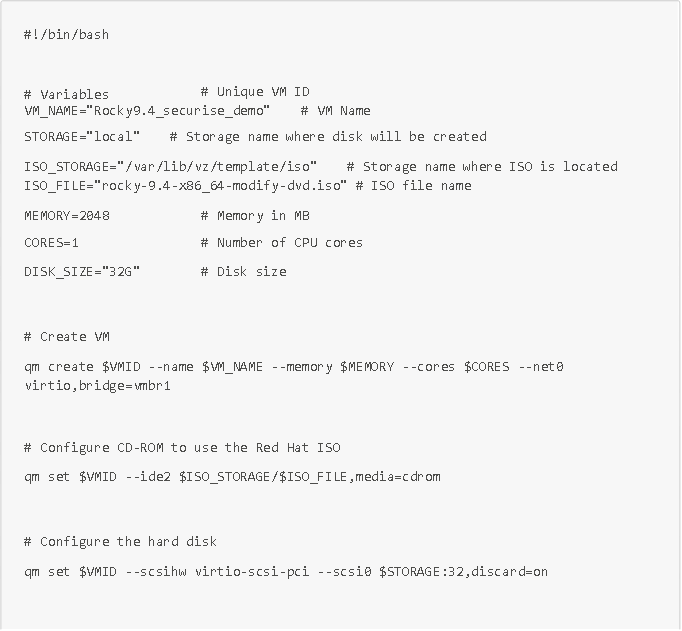
To achieve this, several IAC (infrastructure as code) languages are possible (Terraform, Packer, Ansible, in particular). We will use the qm command line provided by the Proxmox API. This command will allow us to automatically create (or destroy) VMs in Proxmox from scripts. For example, the following script allows us to create and start a VM directly in Proxmox based on the secure ISO we built earlier, named Rocky9.4_securise_demo:

Now that our VM with our hardened and secure ISO has been created and deployed on our Proxmox hypervisor, we can automate tests on this VM via Ansible.
Applying automated tests across multiple VMs using Ansible
We will now move on to the test automation section. For this purpose, Ansible is a very powerful tool in infrastructure as code due to its ease of use, flexibility, and idempotence (the fact that it does not execute a task if the task has already been performed). Using this language, we can perform a multitude of infrastructure tests. For example, we can automatically check the health of the system and its available resources, its security (by checking the status of SeLinux for Linux VMs, for example), its network configuration, its backup, its logs, and more.
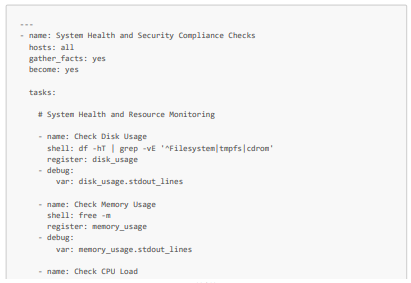
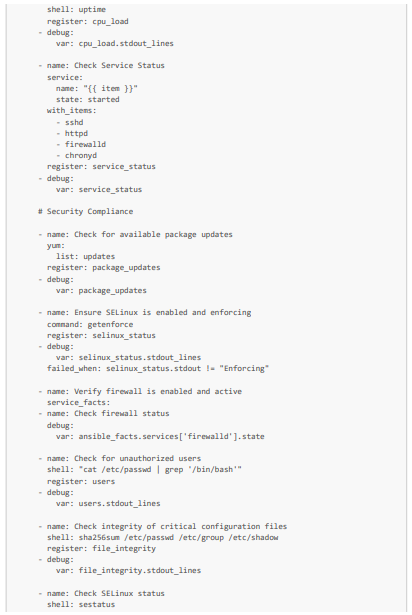
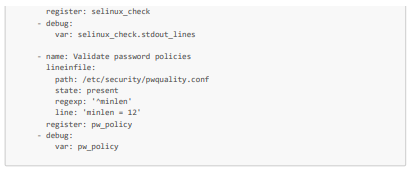
We will look at how to automate checks on the health, available resources, and security of three VMs, including our VM created from the hardened and modified ISO. More specifically, for health and available resources, we will check available storage and memory, CPU averages, and the functioning of critical services (httpd and sshd in particular). Then, for security, we will check that the packages are up to date, the firewall rules, the SELinux status, the absence of unauthorized users, and that the VM password policy complies with security standards.
Here is an Ansible playbook (which we will call system_health_and_security_tests.yml) that allows you to perform these tests:
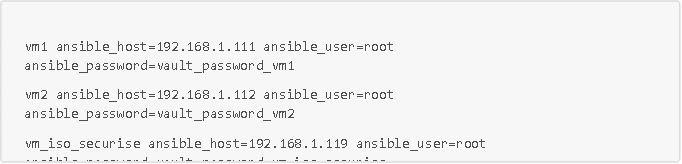
Here is also the inventory of our playbook with our three VMs (which we will call inventory.ini)
To run this playbook:

Conclusion
Thus, integrating CI/CD pipelines with infrastructure as code (IAC) brings significant benefits to software development and operations. By automating the deployment process (i.e., standardized builds and test verification), CI/CD pipelines ensure that infrastructure changes are consistent, reproducible, and less prone to human error. This improves the reliability and stability of environments and reduces bugs and risks associated with manual configurations.
In addition, the use of CI/CD pipelines facilitates faster delivery of infrastructure changes, enabling teams to respond with agility to changing business needs. Automated testing within pipelines ensures that all changes are validated before reaching production, maintaining high standards of quality and security. Version control, which is fundamental to infrastructure as code, combined with CI/CD, promotes transparency and accountability, making it easier to track changes and roll back if necessary.
However, while CI/CD pipelines are essential and highly effective for boosting developer productivity with standardized development environments and automated testing, and for automating system monitoring, they are often tightly coupled to specific environments or particular tools, which can reduce portability. For example, a pipeline designed to run on a particular cloud environment (such as AWS, Azure, or Proxmox) may require adjustments to run elsewhere. In addition, it is often difficult to manage all of the underlying IT infrastructure from a CI/CD pipeline, such as network or storage management. To overcome these two difficulties, combining our CI/CD pipelines with Kubernetes is a very good approach, as Kubernetes is designed to be multi-platform and less sensitive to cloud providers, thus increasing portability, and can track all underlying infrastructure configurations (such as network and storage configurations, for example).
Overall, the combination of CI/CD pipelines and infrastructure as code enables organizations to become more efficient, faster, and more confident in managing their infrastructure, leading to more robust and scalable IT environments that foster continuous innovation. And this combination can be further enhanced and strengthened with Kubernetes.